I am not going to lie. I love getting my nails all done up pretty at the nail salon. I love getting spoiled. I love not having to do all the work myself. At the salon they usually do a better job than I would do at home, and its really relaxing soaking your feet and hands there.
I don’t get them done all the time like some folks do, because it does cost around $20-$30 bucks. And I often want to use that money on other things. Honestly, deep down whenever I get my nails done I feel a bit guilty because it seems wasteful, as it’s something I can do myself at home for free. But I often push back that guilt and do it anyways. It’s just fun. And I love my pretty nails when it’s all done.
By the way, I am a nail biter. So whenever I go into the nail salon the ladies are all like ” You bite your nail? No good…” And I hang my head in shame. Just thought you should all know that little tidbit about me.
But we are talking today about how to save money by doing it yourself at home. So for this post I took my supplies up to my sisters house and did her nails. She was to be my hand model – as there is no way I will be showing off my man hands to you all. I have done this manicure myself many times, using the light colored nail polish. And it lasts for at least a week! Sometimes longer. It’s wonderful. I always choose the light natural looking polish colors so as not to draw attention to my bitten nails. I like them to look clean and lovely.

Here are the two nail money saving tips I wanted to share with you. We all are looking for ways to cut a little bit out of our budgets and save money on things and I hope these help you out.
Tip #1 – Bring your own polish to the nail salon
If you love going to the nail salon often, a thrifty tip would be to bring your own polish. Just buy your own polish in your favorite color and bring it to the salon with you. If the salon is near or inside a bigger department store or mall you can buy some polish there before you head to the salon. I love having my own polish because when I get home after my manicure, if I get a chip or scratch on my nails I can touch them up myself without having to go back in and get them all redone. It can just make your manicure last a bit longer. Which of course can save you money.
Tip #2 – Save money by doing your Manicure or Pedicure yourself at home.
Yes, I know, not as fun. But it can save you some money if you do your nails at home yourself. All you need is some know-how, the supplies and a willing heart.
The know-how: As a nail biter myself I was not used to filing my nails or shaping them. Practice makes perfect and you need to learn how to do it. I found this youtube video helpful for learning. She used a cuticle pusher/trimmer, some cuticle oil a nail whitener pencil and a buffer. Clean your nails, and get them all shaped. Then they are ready for the color. You can do it!
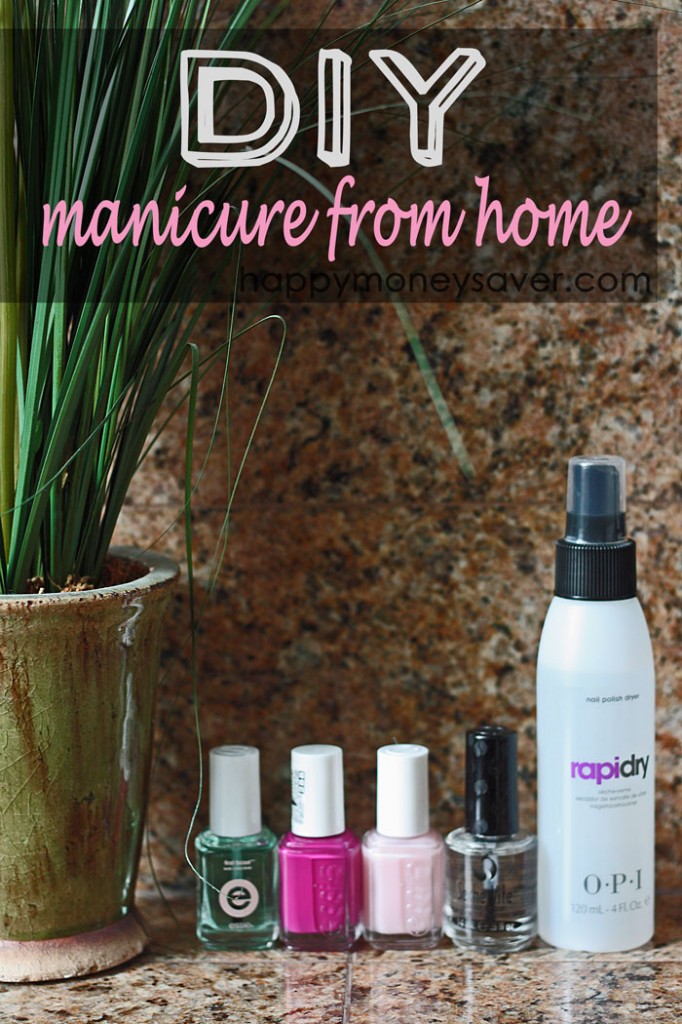
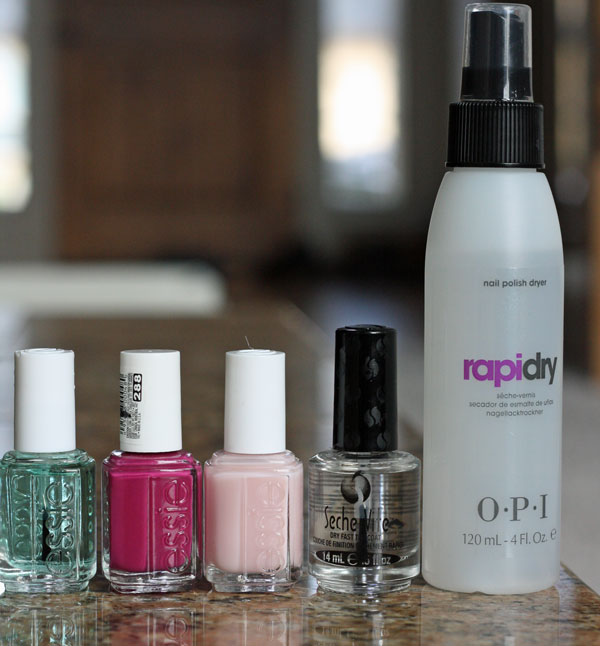
Supplies:
Here is the collection of polishes and products I use for my manicure at home. You could just use nail polish alone, but if you are wanting a manicure that lasts a bit longer this way rocks it.
Essie first base coat polish
Essie Mademoiselle or Essie Big Spender Nail polish are my two favorites. But there are lot’s of other colors available too.
Seche Vite Dry Fast Top Coat
O.P.I. Rapidry nail polish dryer
Method:
Step 1– After you have trimmed, filed and buffed your nails apply one coat of Essie First Base on your nails.
Step 2 – Apply your first coat of nail polish color. Allow to dry. After it’s dry apply the second coat of nail color. Allow to dry.
Step 3 – Apply your top coat nail polish. Allow to dry for a few minutes.
Step 4 – Spray on the OPI Rapid Dry over your nails. Allow to dry completely.
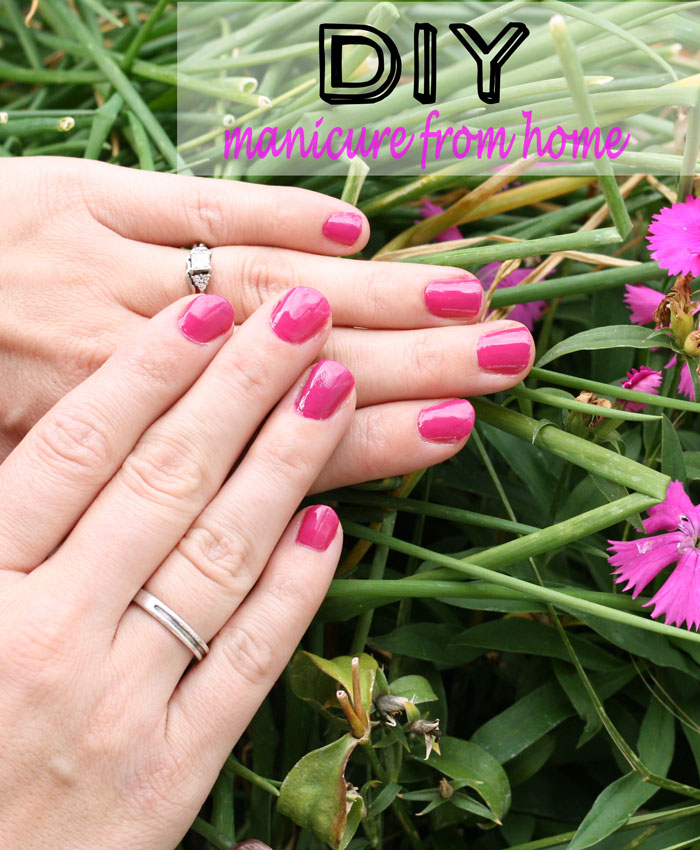
What I love about this method is that it seems to last a really long time – even though as a busy mom of 4 I am constantly cleaning and washing my hands. This DIY Manicure at home method lasts usually a whole week or longer for me. Adding in the top coat and base coat really makes a huge difference. Plus I love using Essie even though it can be a bit expensive because the quality is great. And just a FYI– I find the Essie polishes less expensive on Amazon.com than in the stores – so check Amazon first for your color. At Walmart and Target these polishes can be around $8-$10 each! And on Amazon you can get them for around $5-$6 shipped.
I hope you enjoyed today’s Thrifty tip. See more Thrifty Tips here.
Do you have any other cool ideas of doing your nails at home? Do you have a favorite nail polish color? What is your favorite brand of polish?

About Karrie
Food is my love language. But so is saving money. So I like to combine the two a lot and make thrifty make ahead and freeze meals to save time. Because life is busy, and freezer meals can come to the rescue for all of us. And yes, they actually CAN taste good. Read more...


Comments & Reviews
Denise says
If you want those nail salon smooth heels, mix up about 1/2 cup Listerine mouthwash and 1/2 cup vinegar and soak your feet and especially your heels for about 10 minutes, Take your rasp and work on your heels, anywhere where you have a buildup of dead skin. Soak for another ten minutes, and rasp again or take your towel and rub your heels. You will be amazed at how much dead skin you will remove. Wash your feet, dry, and apply a good moisturizer. Baby soft heels. It’s amazing.
If you have actual cracks in your heels, be careful. This might sting like the dickens and I’m not sure I would advise this method.
Deb Cochrane says
I tried the listerine and vinegar and WOW it worked great. I soaked and rasped. My feet felt and looked amazing. Next time I think I’ll heat the mixture a little first:) after applying the moisturizer I felt like I just had a pedicure. Thanks!
Theresa says
I do my nails at home all the time. I have a large collection of polish from when I had acrylics. Most important parts about a good manicure is quality products and dry time. I also suggest getting a nail polish remover pen like this one: (http://www.amazon.com/POLISH-VARNISH-REMOVER-CORRECTOR-CORRECTION/dp/B00ANL6RDU/ref=sr_1_1?ie=UTF8&qid=1393517397&sr=8-1&keywords=nail+polish+remover+pen) it helps to clean up the edges around the cuticles and really makes it look like you paid top dollar for an at home job. And a good top coat product works great too at reducing your dry time.
Happy.MoneySaver says
Good tip! Thank you!
trish says
You should check out jamberry http://aylawine.jamberrynails.net/ You may like the materials used and it looks like a lot less chemicals
Gloria E. says
Oops! Sorry, should have been Karrie not Carrie.
Gloria E. says
Carrie – I bit my fingernails until I was 34 years old…thought I’d give you a hint on how to stop doing that if you have the nerve to do this! Buy a baby pacifier and when you are in your own home put it in your mouth. You will be surprised at how this can relieve that urge to have your fingers in your mouth. It also keeps you from eating snacks while watching TV. Sounds crazy but it works. Best wishes.
Karrie says
Hello Gloria,
Thanks so much – I may have to try this. I think my biggest problem isn’t wanting to bite my nails just to bite them. It’s when they need to be filed I just use my teeth and that never works out well….LOL. They get torn and too short. Not fun.