This year I am starting a brand new adventure: growing red potatoes in a garbage can. I read about this online and I was fascinated by it. The idea is to plant your potato seeds in a garbage can, then as the plant grows keep adding more soil until the can is eventually full. Then when they are ready to harvest you should have a whole garbage can full of potatoes to harvest.
So here is what you need to get started.
- Large garbage can – 55 gallon is the size I used, but you can also use smaller 20 gallon ones if you have them laying around.
- Drill to add drainage holes to your garbage can
- Gardening Soil – Lots of it
- Seed potatoes or potatoes that have sprouted
First thing you need to do to grow potatoes in a garbage can is to drill some holes in your garbage can. The happy husband showed off his manly skills for me by drilling them with his power drill all along the bottom and up the sides of the can like. I was really impressed. He has been really impressing me a lot lately with his building skills. Which reminds me, we are STILL working on the chicken coop. It is such a long process.
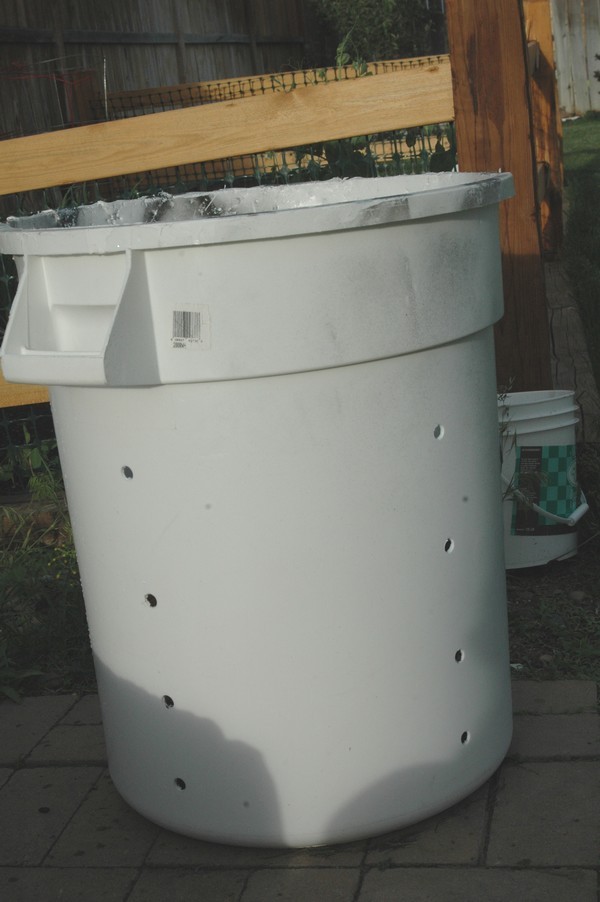
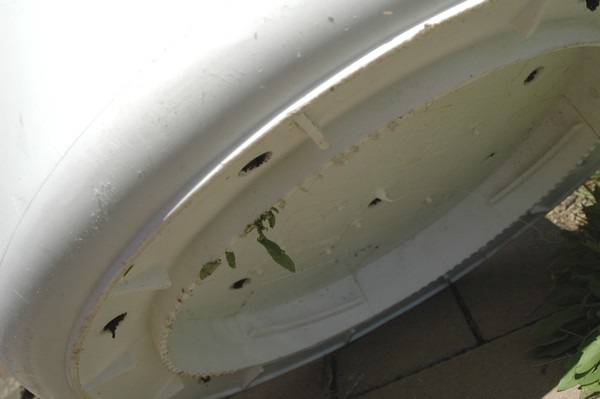
Make plenty of drainage holes on the bottom and up the sides. Otherwise you will have rotting potatoes… Ain’t nobody want that.
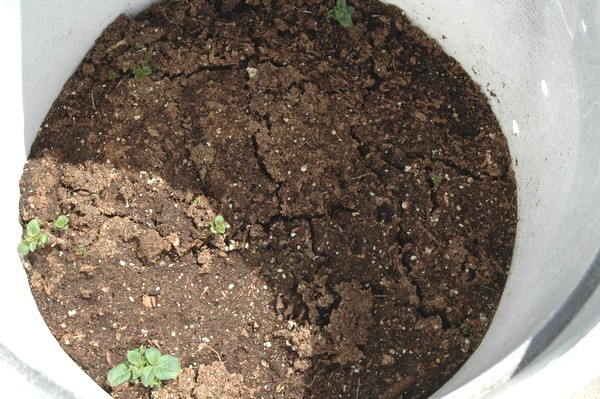
If you have some gardening fabric or pottery chips/stones feel free to add a layer to the bottom of your garbage can.
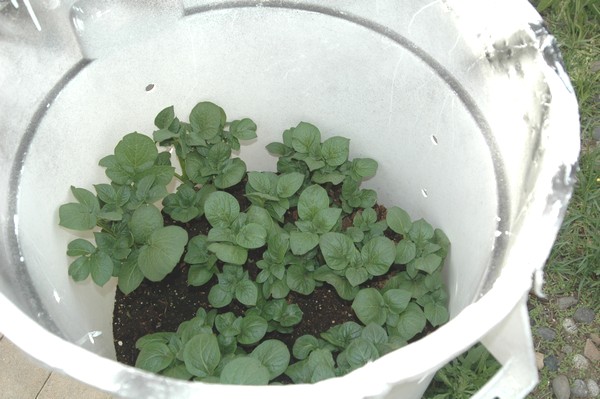
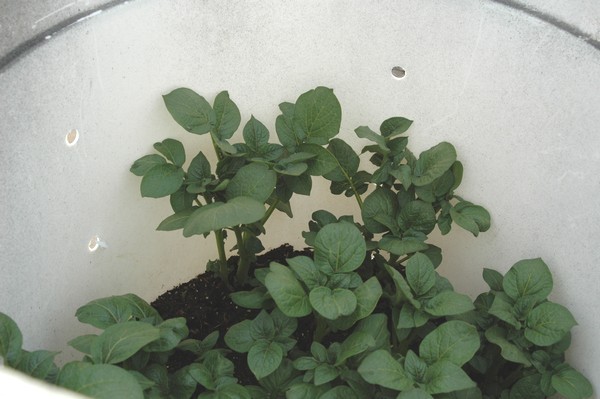
Next I filled up a little under 1/4 of the can with soil (around 12 inches). Then added my red potato seeds and covered them with 3-4 inches of soil. Sorry I don’t have a picture of this – I took the pictures and then my camera card got fried. But here is a picture of the potato plants starting to come up after 5-6 days.
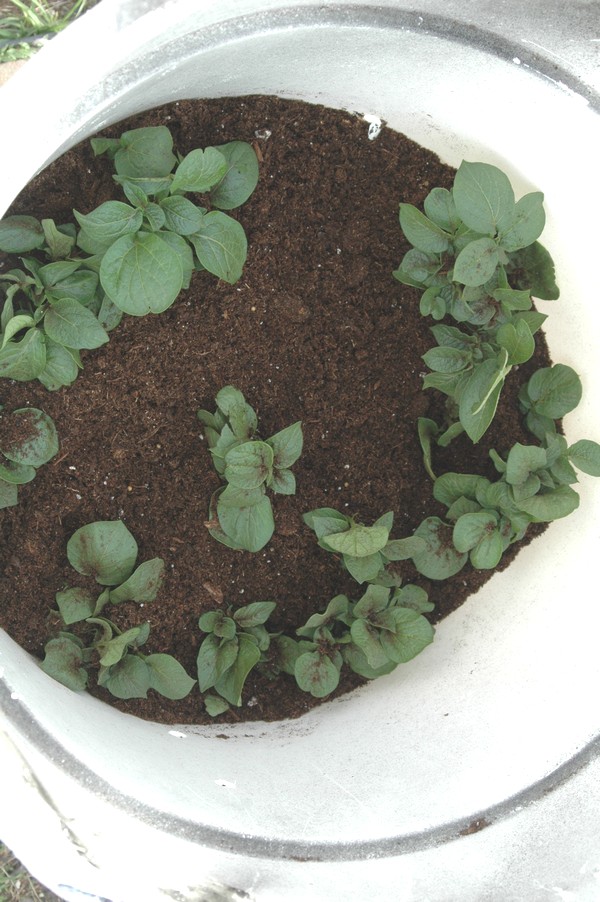
Once the plants are about 6” tall or so, add about 3 more inches of soil covering up the leaves and everything on the bottom ½ of the plant.
Repeat this process throughout the growing season until the can is almost full. Oh, and be sure to water your garbage can potatoes just as you would the rest of your garden.
Eventually when you get to the top, add a nice layer of mulch and wait. The potato plants will grow really long out of your can. Then when they wilt and die off, wait two weeks and you should be able to harvest them. The cool thing is that you can just grab a tarp and pour out your bucket to collect your dear amazing potato crop.
I will update you on the progress of how it is all going and hope that I will be able to share a story when I am done on how I successfully grew potatoes a la garbage can.
Have any of you ever tried this method before?

About Karrie
Food is my love language. But so is saving money. So I like to combine the two a lot and make thrifty make ahead and freeze meals to save time. Because life is busy, and freezer meals can come to the rescue for all of us. And yes, they actually CAN taste good. Read more...


Comments & Reviews
Merilee says
What did you use under the plastic container? I am wanting to grow some in a greenhouse this Winter.
Karrie says
Nothing, just placed it on grass or dirt for drainage. 🙂
Ximena says
No es mucho 50 galones? Cada galón son 3,785 litros. Esas tinetas son de 20 o 25 lts litros, máximo 5 galones.
Audrey Anton says
You never answered anyone who asked how many potatoes you originally planted in the garbage bin. Could you please give us an answer thanks for your help in this matter.
Karrie says
Gosh, that was soooo long ago, haha! I think it was like 5 small potato seeds!
Rey C says
This is good for small spaces. I found another method that is plant and forget I’m trying…so far it is working: https://www.youtube.com/watch?v=vJW4z-I_lrw
Margie says
I have done this only I planted potato seeds in about every foot or so of dirt. After I harvested the first crop, the next would start growing. Always had potatoes. . The way you are doing should work just fine.
Rebecca Arnold says
How many seeds did you plant in a 50 gallon bucket? Is it too late in the season to start?
Brianne Jones says
Have you tried this with any other type of potato?
Happy.MoneySaver says
You can do this with just about any potato!
Jenny says
How many seeds can you plant in the 50 gallon trash container?
François Lamontagne says
I am trying it this year! How did it turn out for you?
Christi says
Did I miss your update as to how well your potatoes did?
Carly Cline says
I’m starting my first potato bucket this next week and I’m so interested to know how your crop turned out! I was also wondering if you could grow sweet potatoes in the same way?!
Thanks so much!! 🙂
Happy.MoneySaver says
Yep! You can also do sweet potatoes!
Sarah says
I wanted to ask if you plant from a sprouting potato how do you do it exactly? Do you just put the whole potato in the dirt? How long do they take from planting to harvesting? and can you use any variety of potato? Sorry so many questions but I’m definitely not a green thumb.
Your website is fantastic to. About to start your cleaning routine as I have 4 kids (3 boys 6,4,2 and 1 girl 2 months) so anything that helps get a bit of organisation going is great. TIA
Rebekah says
Any eye of a potato has the potential to grow a new plant. Each plant will grow it’s foliage and save extra energy/food for itself for later in the form of a tuber – the potatoes we eat! So one potato with a lot of eyes can be cut into pieces and have a lot of others grown from it. If you have some very small ones when you harvest you can use those as seeds for next year. Sweet potatoes can be grown the same way. We did a small pot full and had the best sweet potato fries ever on harvest day! 🙂
Mrs. Whitt says
When is it too late to do the potato thing?
Blair Blycker says
I have a kids’ craft book with similar directions for planting potatoes in garbage BAGS. Both sound fun. Our family plants potatoes in rows of straw. The potatoes are set on the top of the soil and covered with 6 inches of straw. As the potato plants grow, more straw is added till we have a large mound. The potatoes grow great and I can harvest just the potatoes I need that night instead of having to dig up the entire plant. Works great for early “baby” potatoes. And another bonus is that the potatoes are harvested clean since they don’t actually grow in the soil. You just have to be sure to have plenty of straw on top to avoid letting the sun get to the potatoes (which causes a toxic chemical to develop in the potatoes with a tell tale green color in the flesh) We ended up with very little labor and a lot of taters!
Karrie says
Hi Blair, I should totally try the straw method next year. Sounds great.
Christine says
We’ve been “recycling” plastic bottles (with the lids on) as both filler and drainage helpers in the bottom of some HUGE plastic pots I got for cheap 2 years ago at a yard sale. It works really well and keeps the pots from getting too heavy. It should work pretty awesome in the bottom of a garbage can for potatoes and it definitely lets it drain well. Our plants have been really happy in the pots.
Amanda says
I’ve seen this idea in a wooden barrel! Didn’t think to try a garbage can, but I have to ask (because I think when I saw the other idea they said to do this and I’m confused) but when you add soil, do you add more potato seeds? If not, then does the part you buried become roots and grow into a potato too? Just technicality questions but I’ve been wanting to do this and I want to make sure to do it correctly! 🙂
Karrie says
Nope, you don’t add more potato seeds. It’s magic (this is what I tell my kids…hee hee). The roots tuber out or something (like I really know the science behind it all..) and will form layers of potatoes as far as I have read.
Yuki says
We have grown our potatoes this way for the last 3 years. Last year we did 3 varieties: russet, red, and yukons. Our total yield last year was 25 lbs of potatoes. The kids had a great time digging them up. Just a little advice from our own experience. Use light colored garbage bins, the black ones retain too much heat and fry the plants. 🙂
Karrie says
Oooh, 25 lbs would be awesome!
Heidi says
I”ll be interested to see your results – the year we tried going extreme on burying our potato plants deep (we used a wooden frame to build up around and piled dirt on top) there were no potatoes on the top 75% of soil, they were all in the bottom part anyway. We’ve never bothered going beyond a simple trench since then. But it will be cool if it does work!
Karrie says
You will have to let me know how your potatoes do too!
margie says
I like this idea. I think I will try it. PS- we are still working on our chicken coop too. When you buy the little chicks, it seems like six weeks is more then enough time to build them a home. My chick are way over six weeks old and have 1/2 of a coop done. Maybe the Coop should before the chicks.
Karrie says
I agree. When you are trying to build a coop yourself there are just so many little steps involved, wiring, framing, boxes, hatch, roosting bars, windows. Oh man. Its taking forever.
Yoko says
This is really interesting! I am excited to see how it goes too!! Good luck! 🙂
Karrie says
Thanks!
Karrie says
Me too! I will let you all know. Hoping to get tons of lbs from this one can.
Dannon White says
I grew mine in a storge tub I had in a closet just wanted to try it and wow the plants are as tall as my tomato plant’s thanks for the article cause I couldn’t remember when two harvest them.
Jill says
Can’t wait to see how they turn out! This looks really easy and fun.