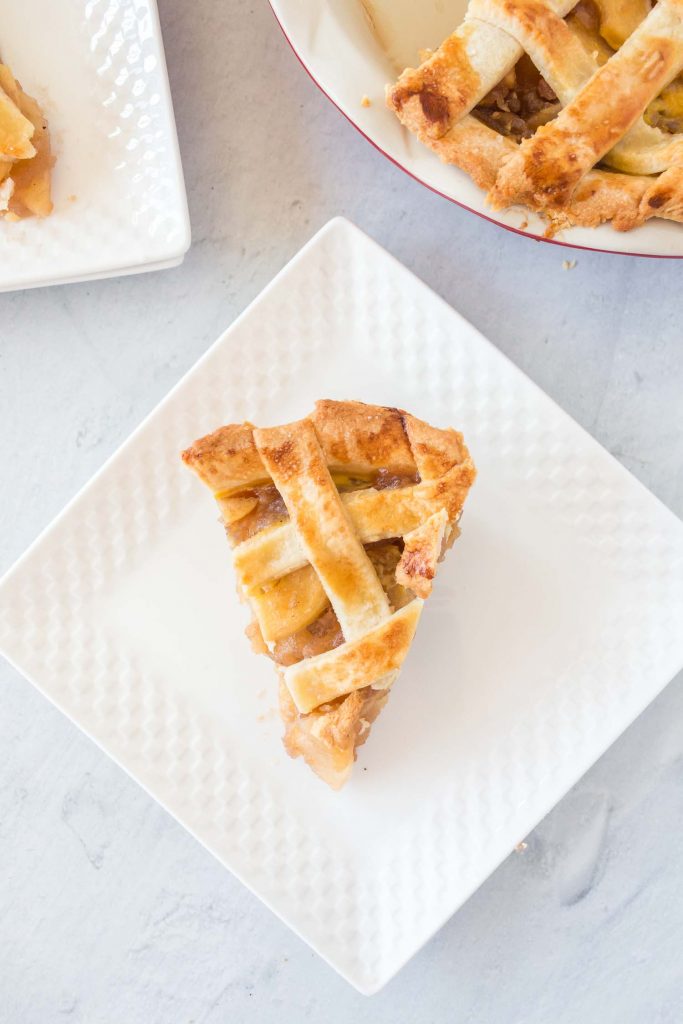
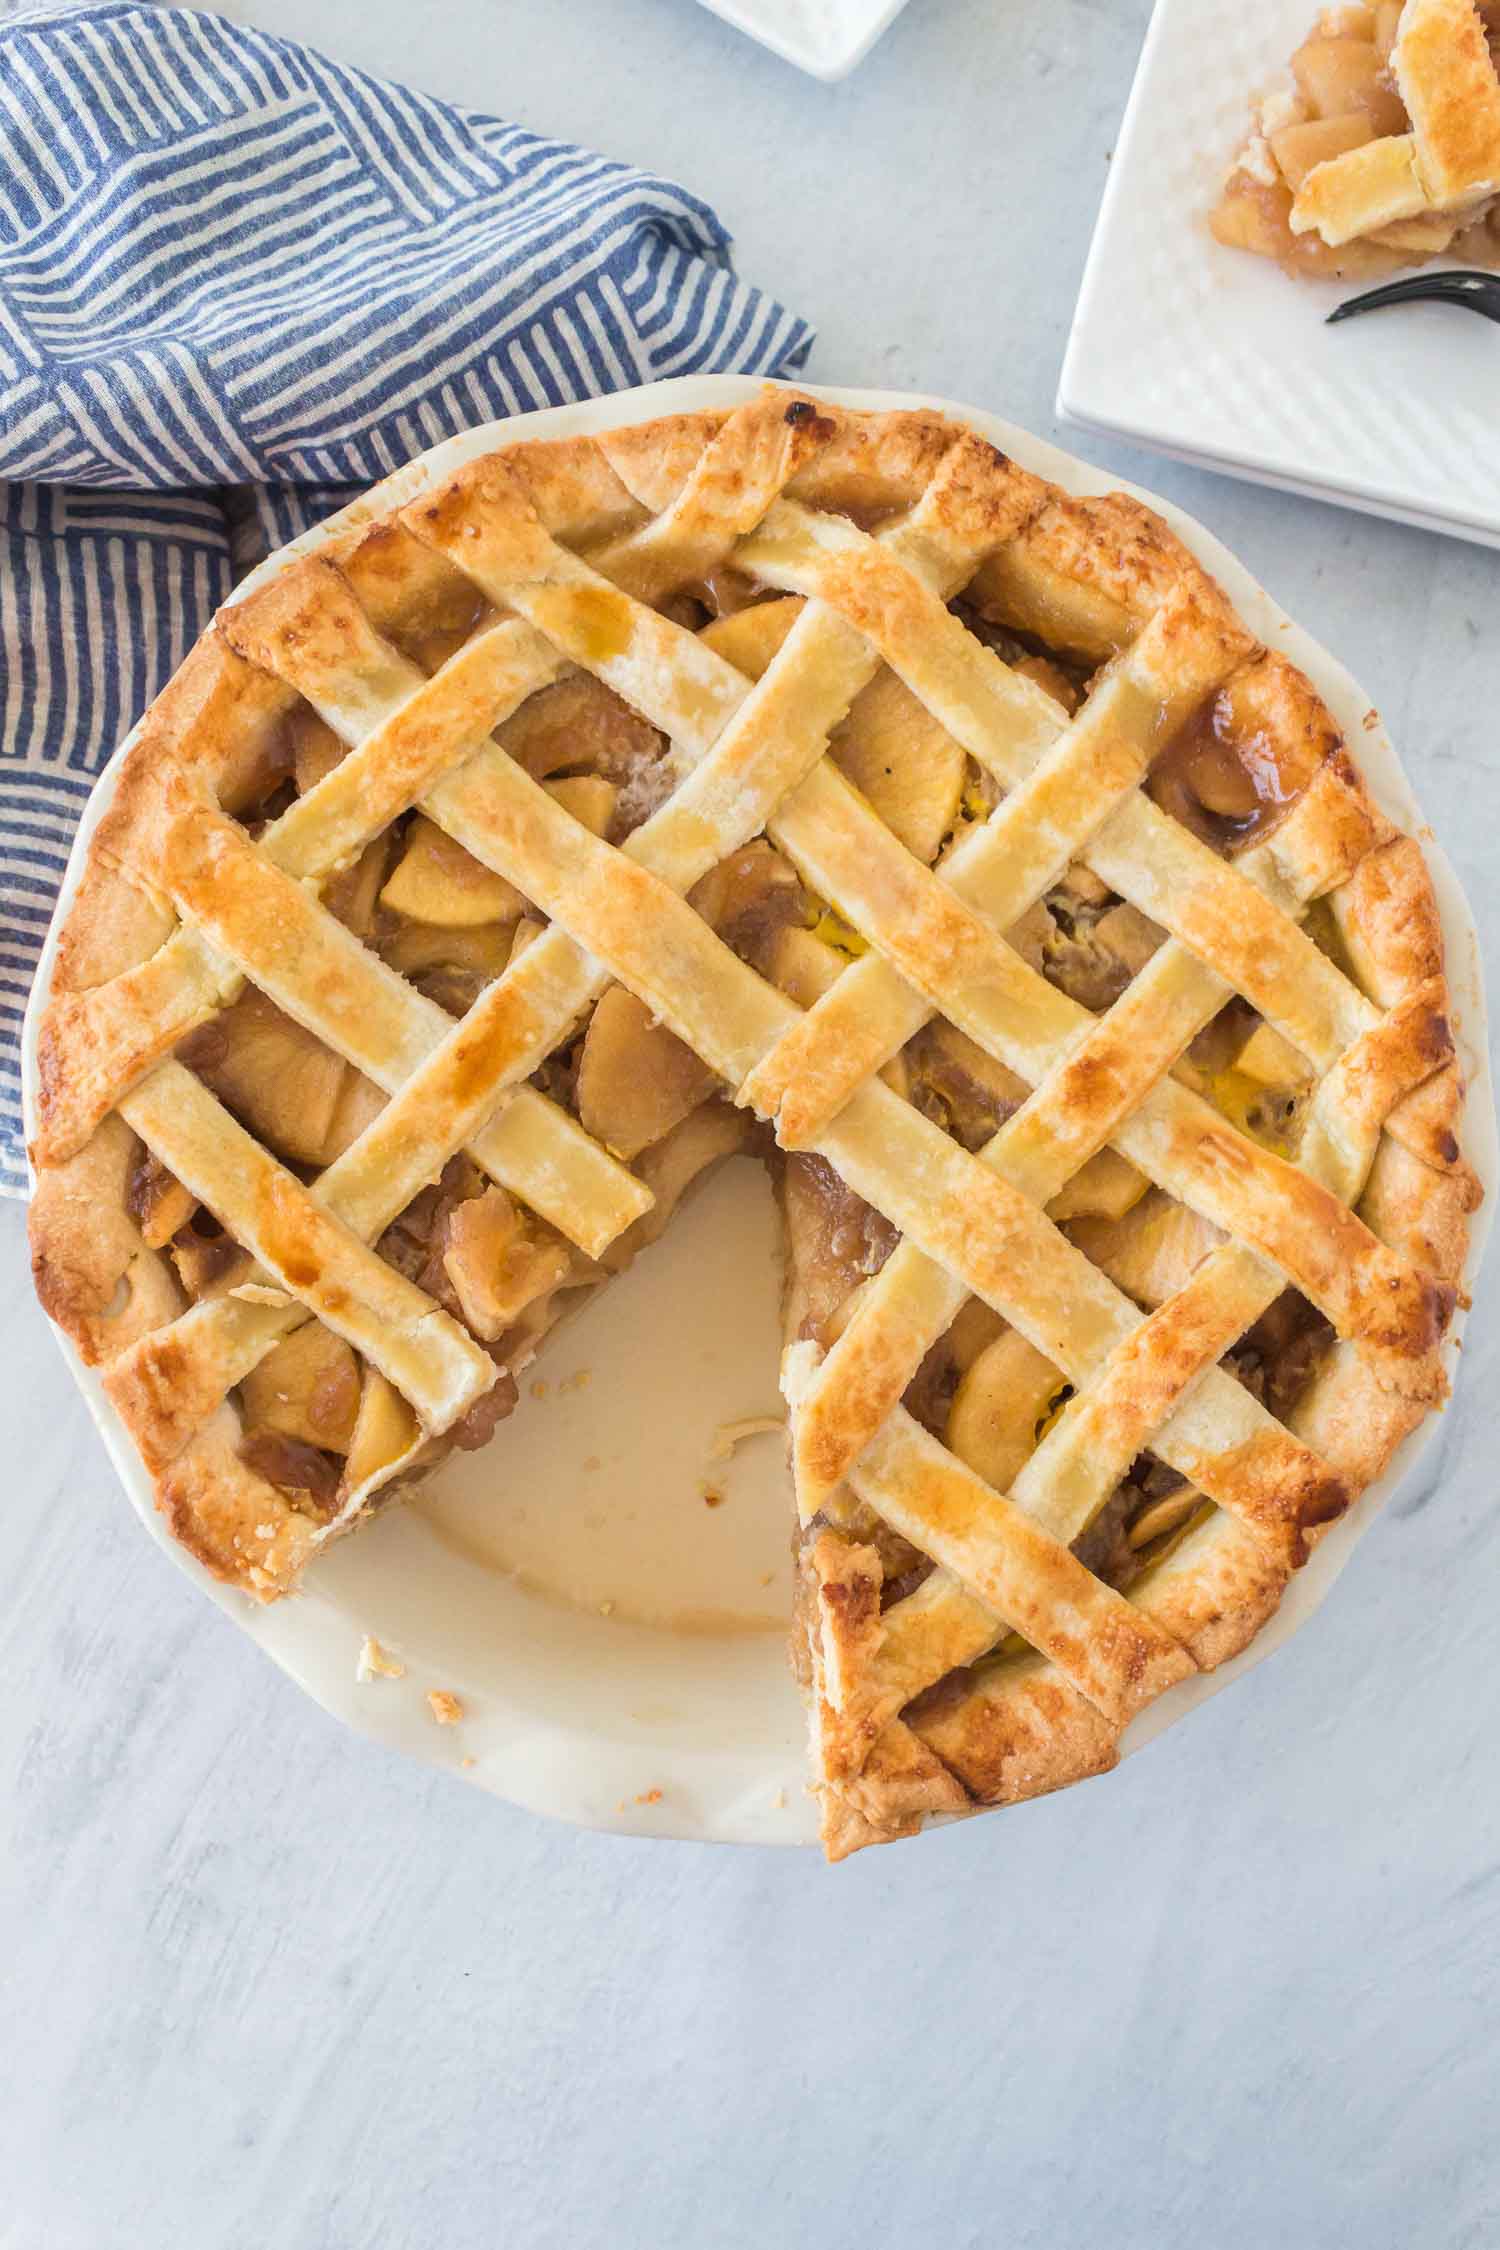
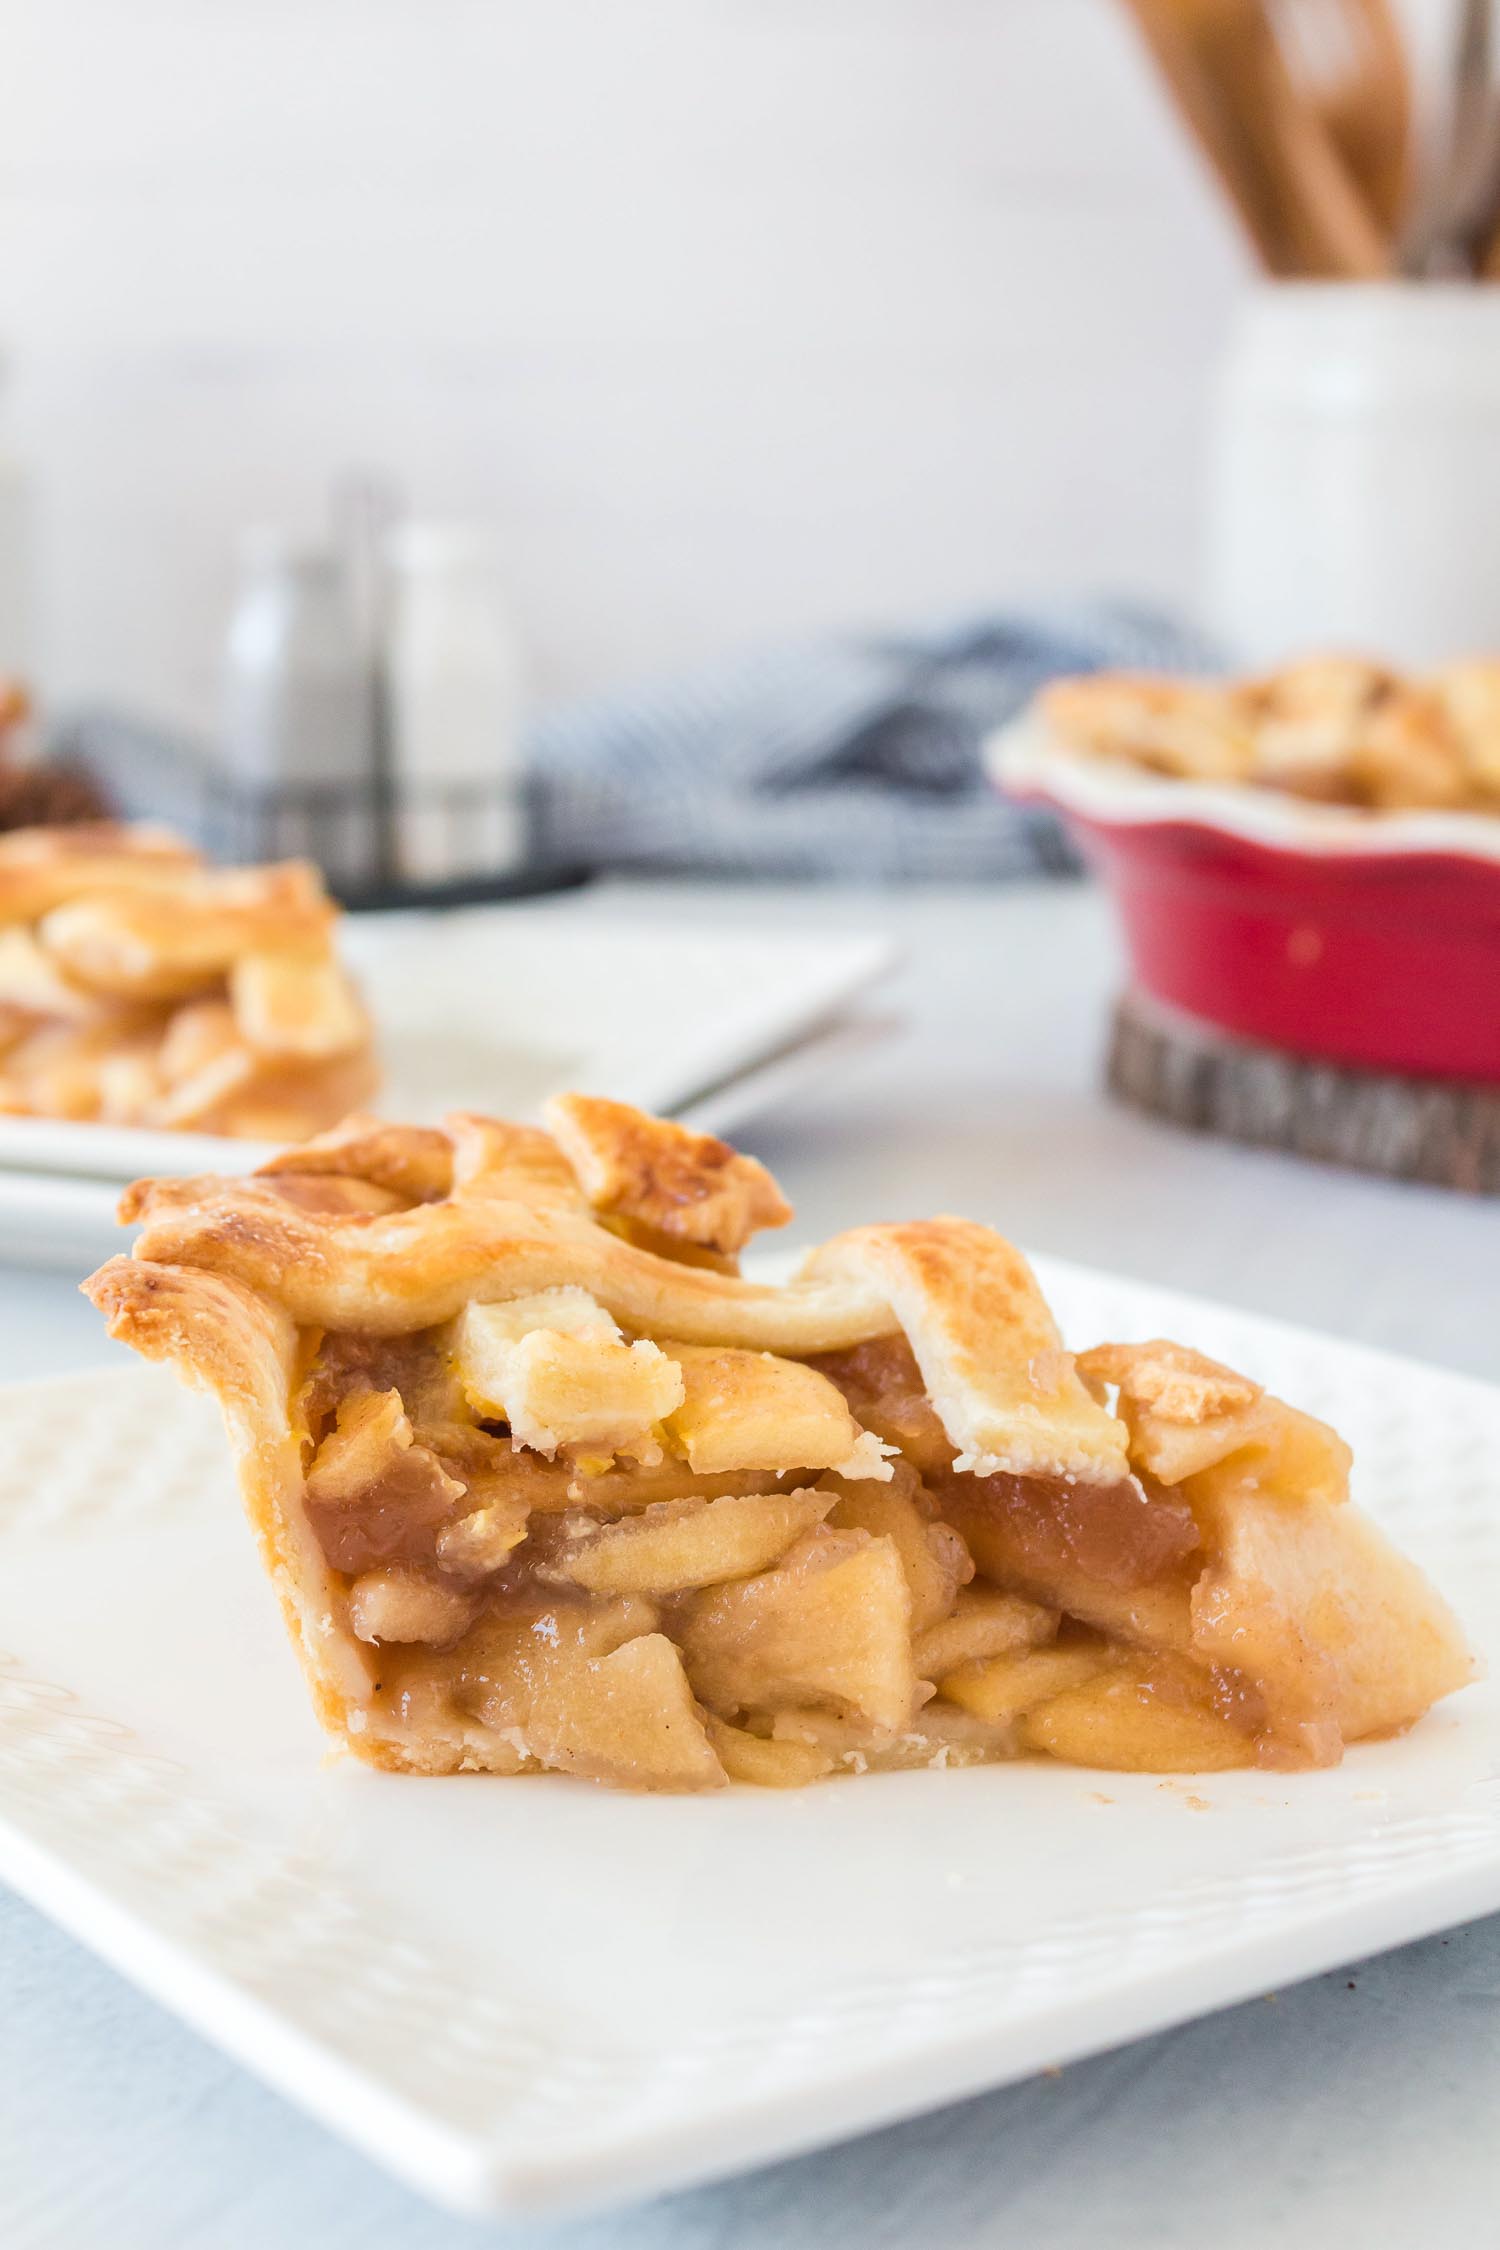
This homemade apple pie is downright magical! Sweet and tangy bites of warm, spiced apples in a velvety sauce, tucked inside a buttery pie crust. We’ve made this classic American dessert super-easy to prep and bake. It tastes SO GOOD warmed up with a scoop of vanilla ice cream.
Homemade Apple pie is everything we love in a dessert. It’s the perfect balance of sweet, buttery, tangy, and smooth. Substantial, without being over-the-top decadent.
I mean, what other dessert can be a seasonal treat in the fall, a holiday dessert in the Winter, and the star of any Summer-time picnic? No matter where you are or where you’re from, apple pie always tastes like home. It’s the ultimate comfort food.
And you can eat it anytime.
After dinner, before dinner, after lunch, late at night… Nothing can compete! A banana split at 10am? No way. Apple pie and hot chocolate at 10am? Absolutely!
The beauty of this particular recipe is that you can create this pie from start to finish, or prep the filling and freeze it to use in a quick homemade pie a couple of months from now. The apple pie filling freezes perfectly, awaiting your command.
Best of all, this iconic dessert requires just 9 ingredients, most of which you already have. #BudgetFriendly
WHAT KIND OF APPLES ARE BEST?
Apples will naturally soften when baked, so it’s important to start with apples that are fresh and firm. If your apples are soft, your apple pie filling will end up being mushy.
Before shopping for your apples, decide on the flavor profile you want for your pie – “sweet” or “tart,” or a hybrid of the two. There are more than 100 varieties sold commercially in the United States, and most grocery stores and farmer’s markets will have a few varieties in each flavor category.
Examples of Sweet apples: Golden Delicious, Northern Spy, Braeburn, Jonagold
Examples of Tart apples: Granny Smith, Cortland, Empire, Jonathan
Combining sweet and tart apples in the same pie adds a new and wonderful dimension to the desert. Almost any apple makes a delicious pie. Just steer clear of Red Delicious and Gala apples, which are better suited for applesauce because of their softer texture.
CAN YOU FREEZE AN APPLE PIE?
Yes, you can…but there’s a better way. Instead, freeze the apple pie filling and the dough for the pie crust separately. They can wrapped, sealed, and frozen much better by themselves than they can as complete frozen pie. Plus, this gives you the versatility of using your filling in other recipes (like Old Fashioned Apple Crisp). Similarly, pie crust that isn’t already filled with apple pie filling can become a pumpkin pie, pecan pie, or even a chicken pot pie.
HOW TO MAKE APPLE PIE
First you’ll want to make your pie crust dough. Here’s how you do that. Oh, and by the way, the full recipe with ingredients is down below in my printable recipe card.
HOW TO MAKE PIE CRUST DOUGH – Step by Step
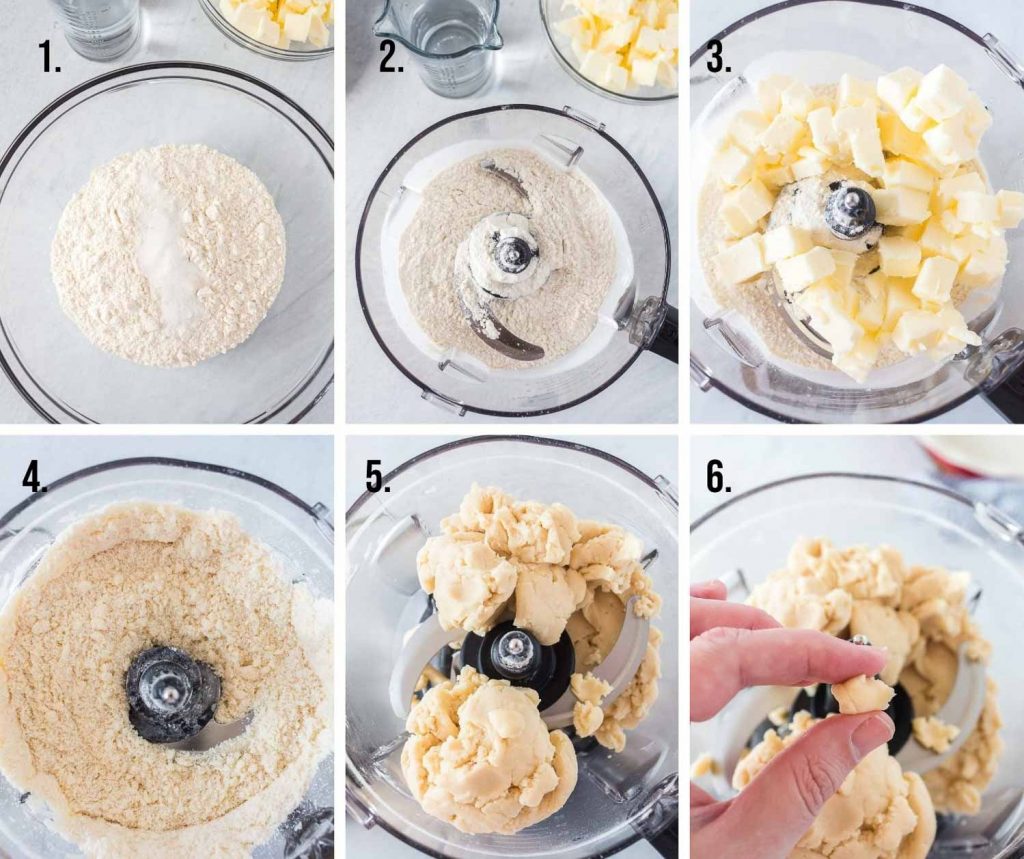
- Place flour, sugar and salt into the bowl of a food processor.
- Pulse a few times to combine.
- Add cold diced butter to the machine next.
- Pulse the mixture until coarse crumbs form with some pea-sized pieces. then stop mixing. Mixture should remain dry and powdery.
- Add ice water and pulse just until moist clumps or small balls form.
- Press a piece of dough between your finger tips and if the dough sticks together, you have added enough water. If not, add more water a teaspoon full at a time. Be careful not to add too much water or the dough will be sticky and difficult to roll out.
Transfer dough to a clean work surface, and gather dough together into a ball (it should not be smooth and DO NOT knead the dough). Divide dough in half and flatten to form 2 disks.
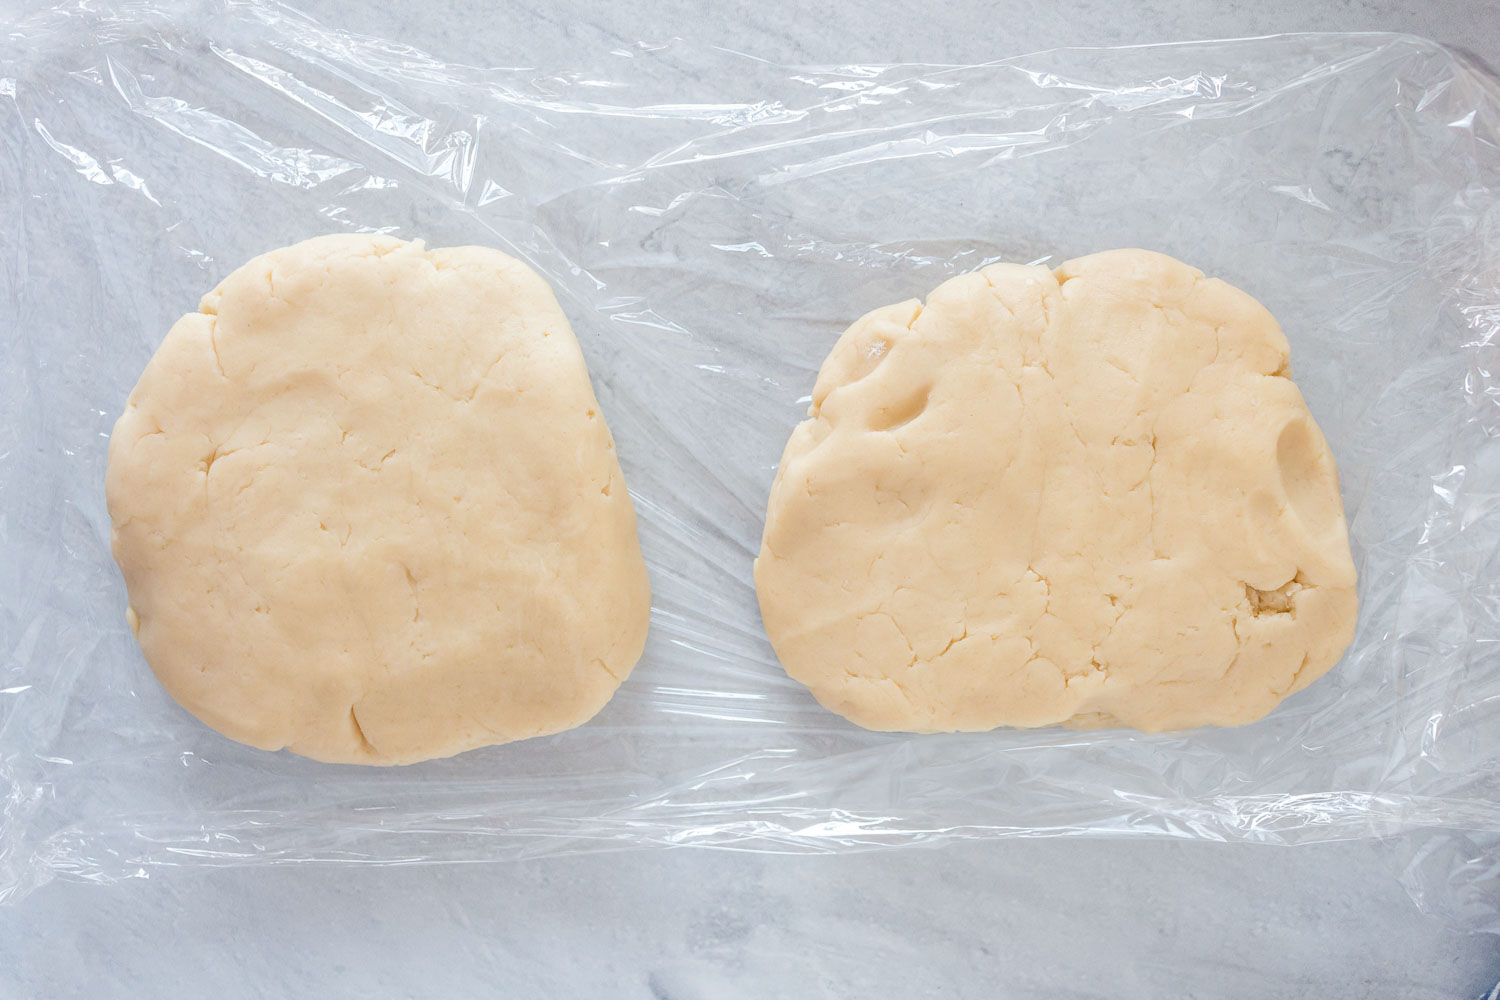
Cover each disk with plastic wrap and refrigerate 1 hour before rolling out. To freeze the dough, add a second wrapping of aluminum foil to each disk, then seal the disks in a freezer storage bag.
HOW TO MAKE APPLE PIE FILLING
If you didn’t make ahead and freeze your apple pie filling you’ll need to make a fresh batch of it. Here’s how to do that.
- Prep your pie crust: Roll out your pie dough crust and place it in your pie dish, pressing it snuggly against the bottom and sides. This will be your bottom crust. Refrigerate it while you’re preparing the filling.
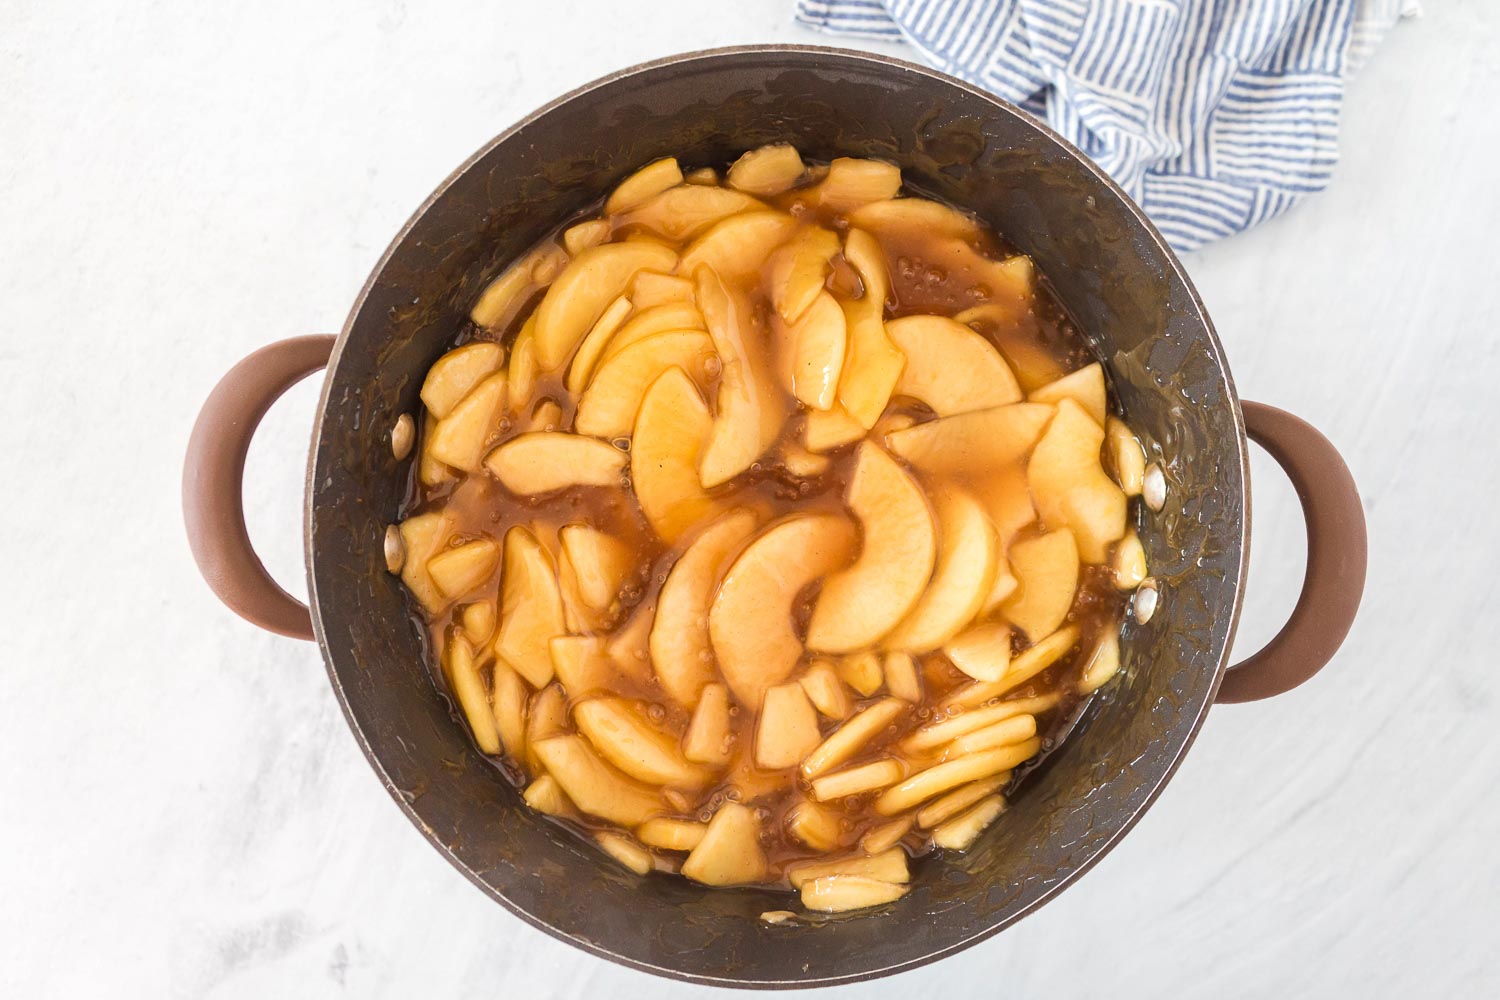
- Cut & Soak Apples: Peel, core, and cut apples into 1/4-inch-thick slices; halve crosswise, and add to bowl. Pour lemon juice on top of apples and a few cups of water (to keep them from turning brown) as you work. Then drain apples using colandar and return to bowl.
- Add Spices: Add sugar, flour, cinnamon, and salt to the apples; toss to combine.
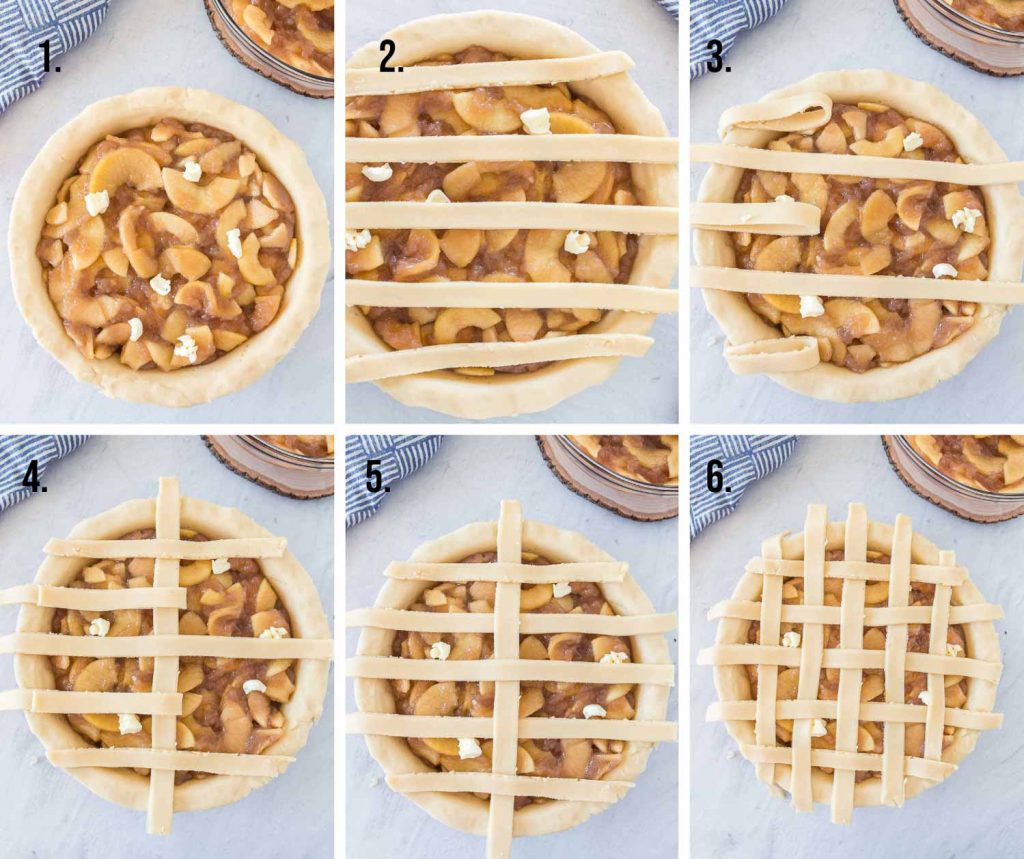
- Add the filling. Remove dough-lined pie plate from refrigerator. Fill with apple mixture, gently packing apples and mounding slightly in center; dot with butter.
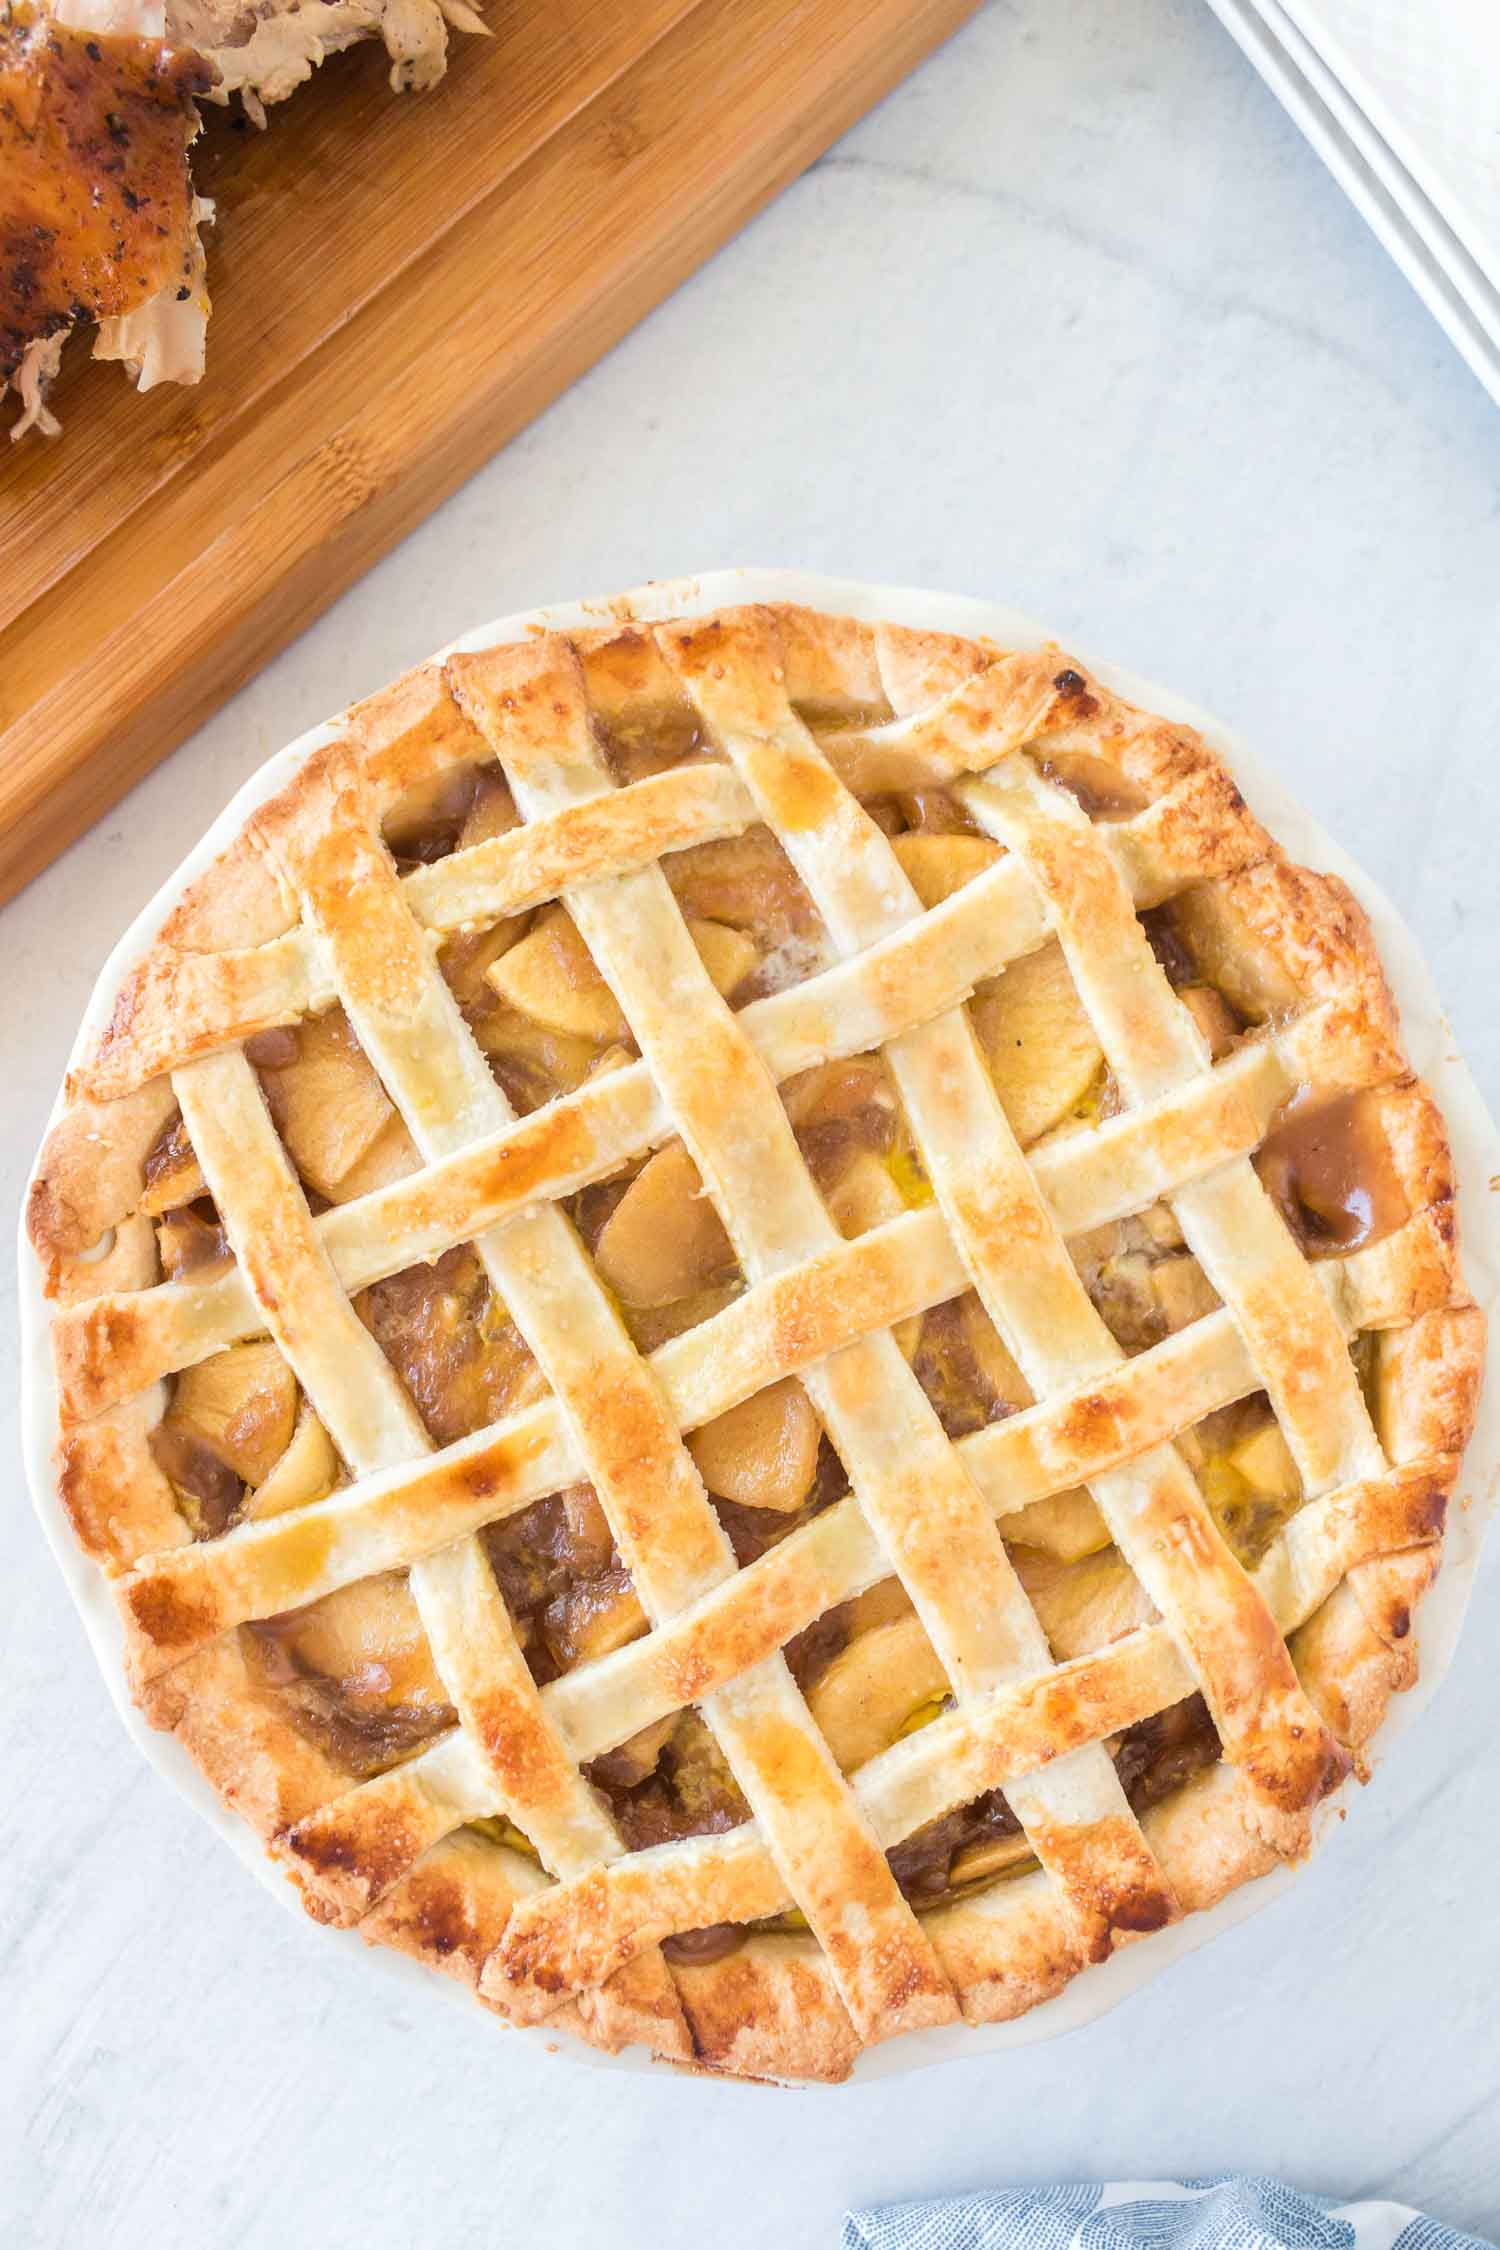
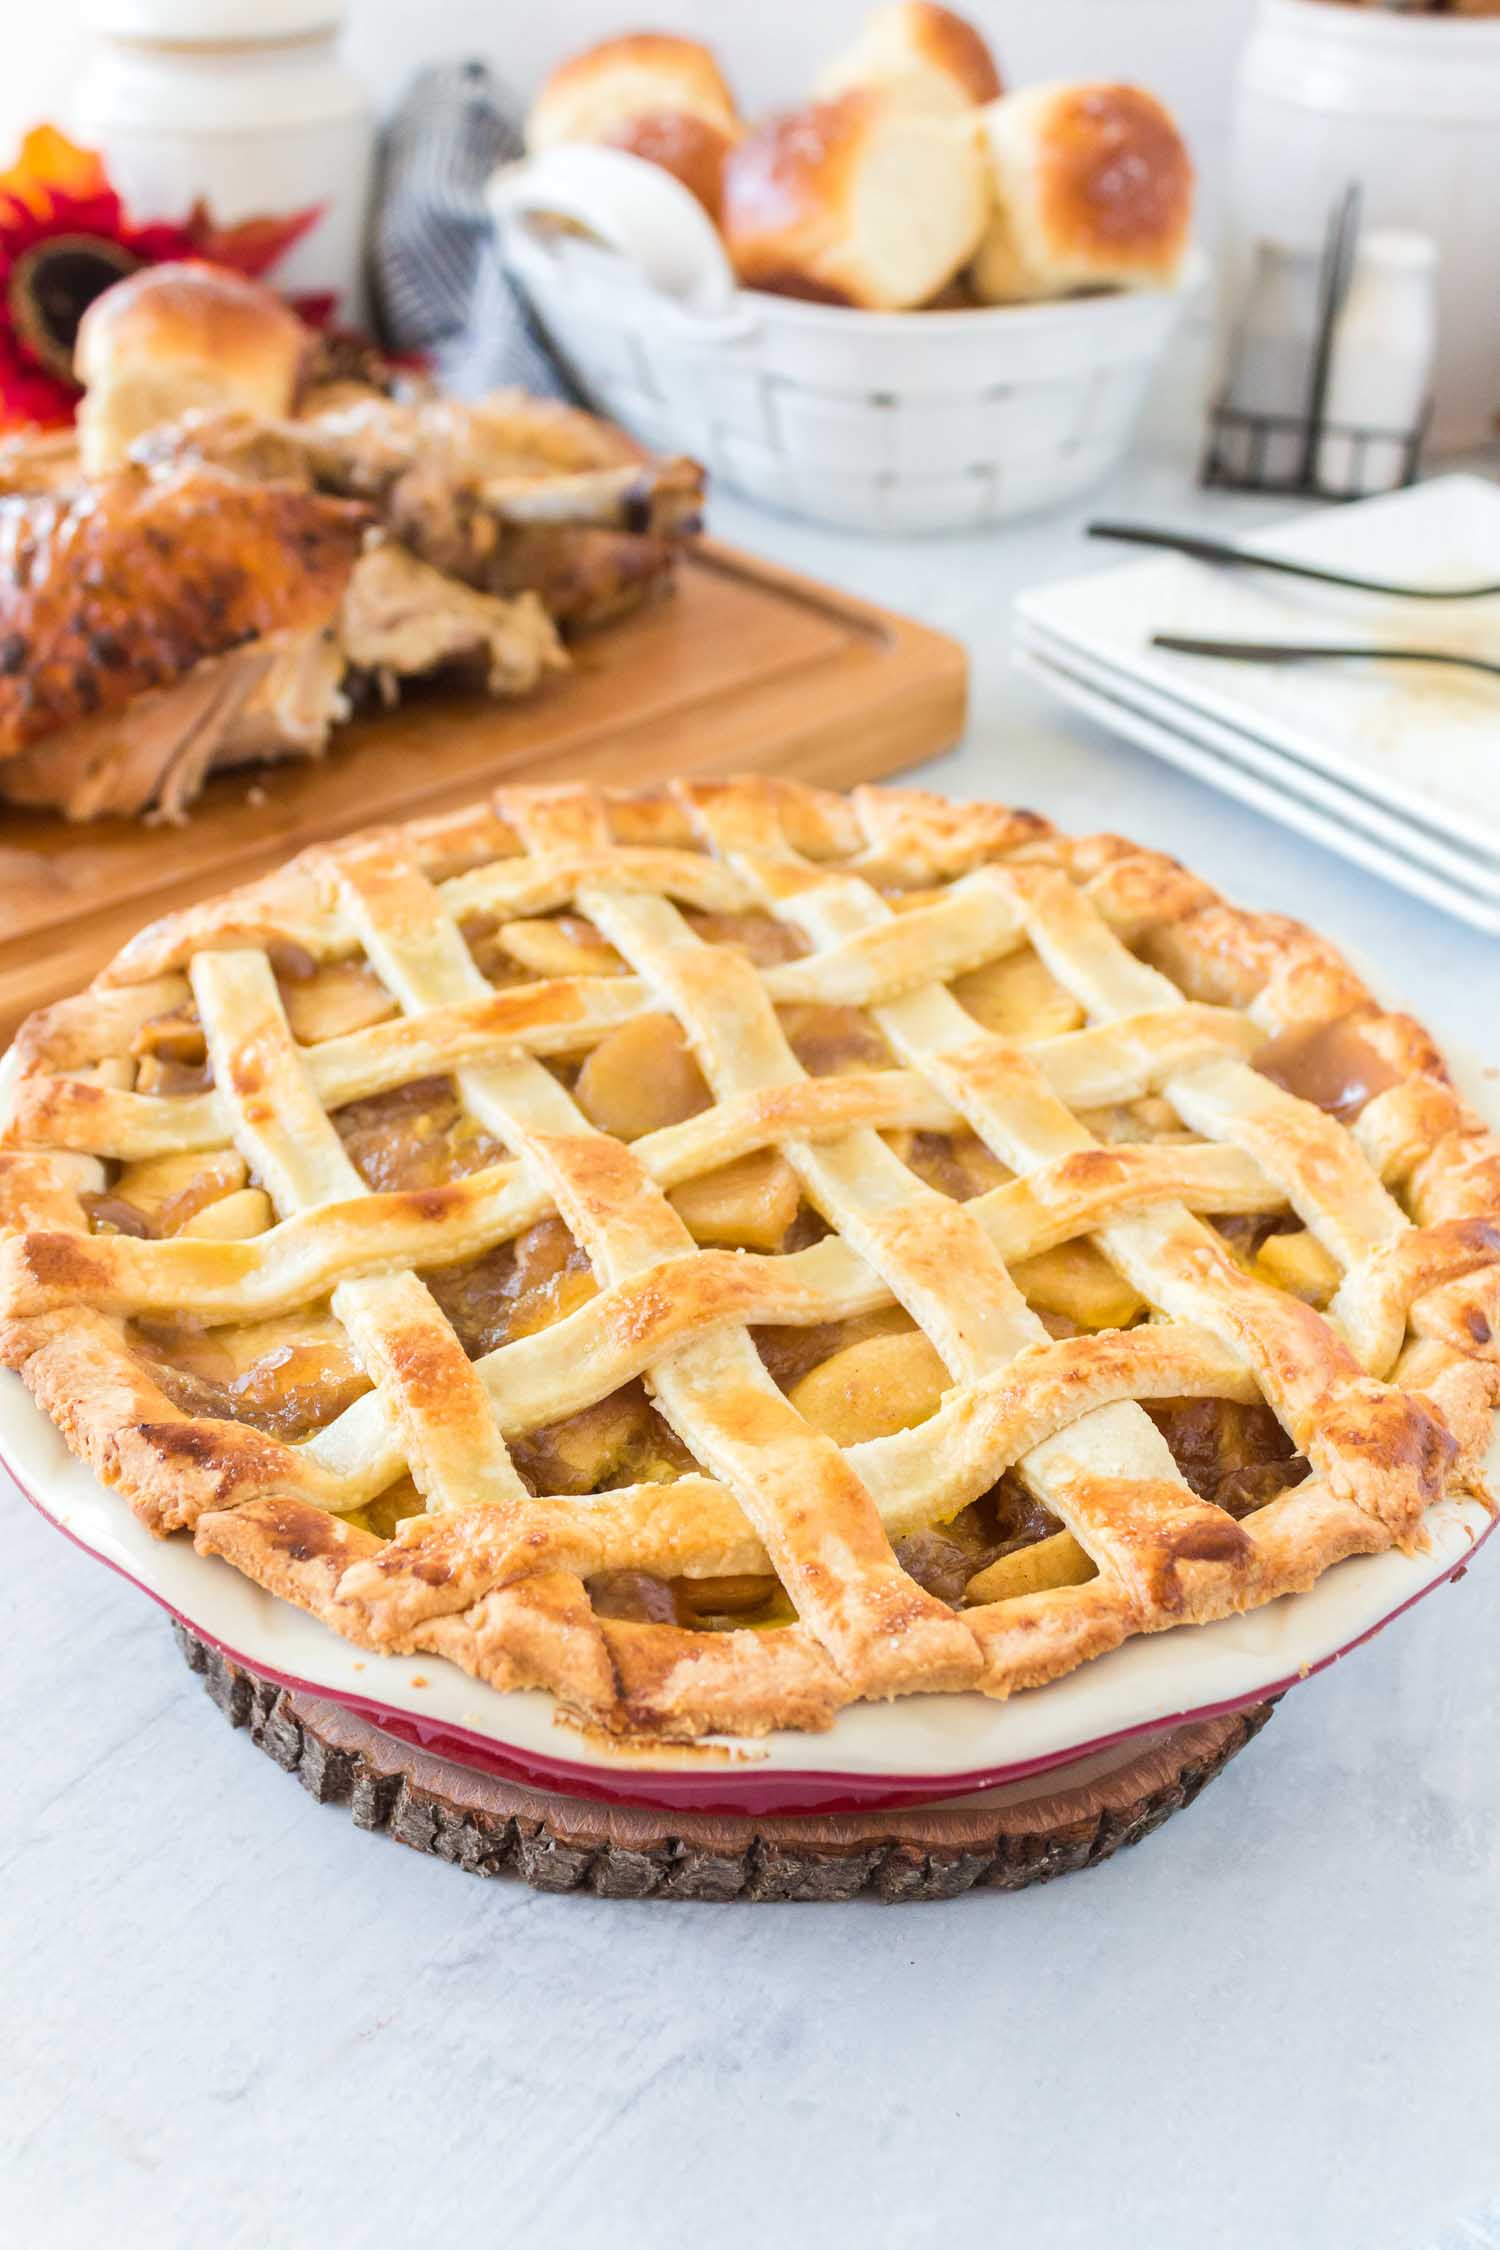
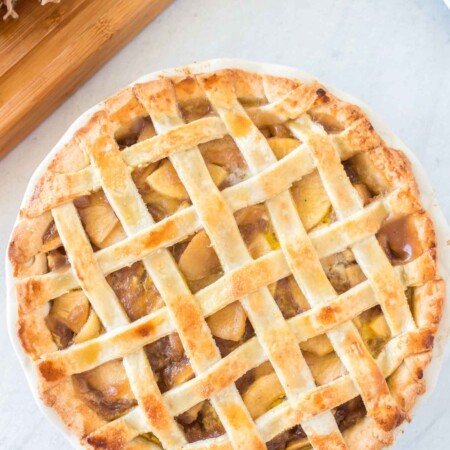
- Top crust time: Add top pie crust, pinching to seal top and bottom together.
A lattice crust looks complicated, but it’s not. If you can tie a shoelace, you can make a lattice crust!
HOW TO MAKE A LATTICE PIE CRUST
Although, if you’d like to keep things simple, a traditional flat top crust will be equally delicious. Add design or simply poke holes in top crust.
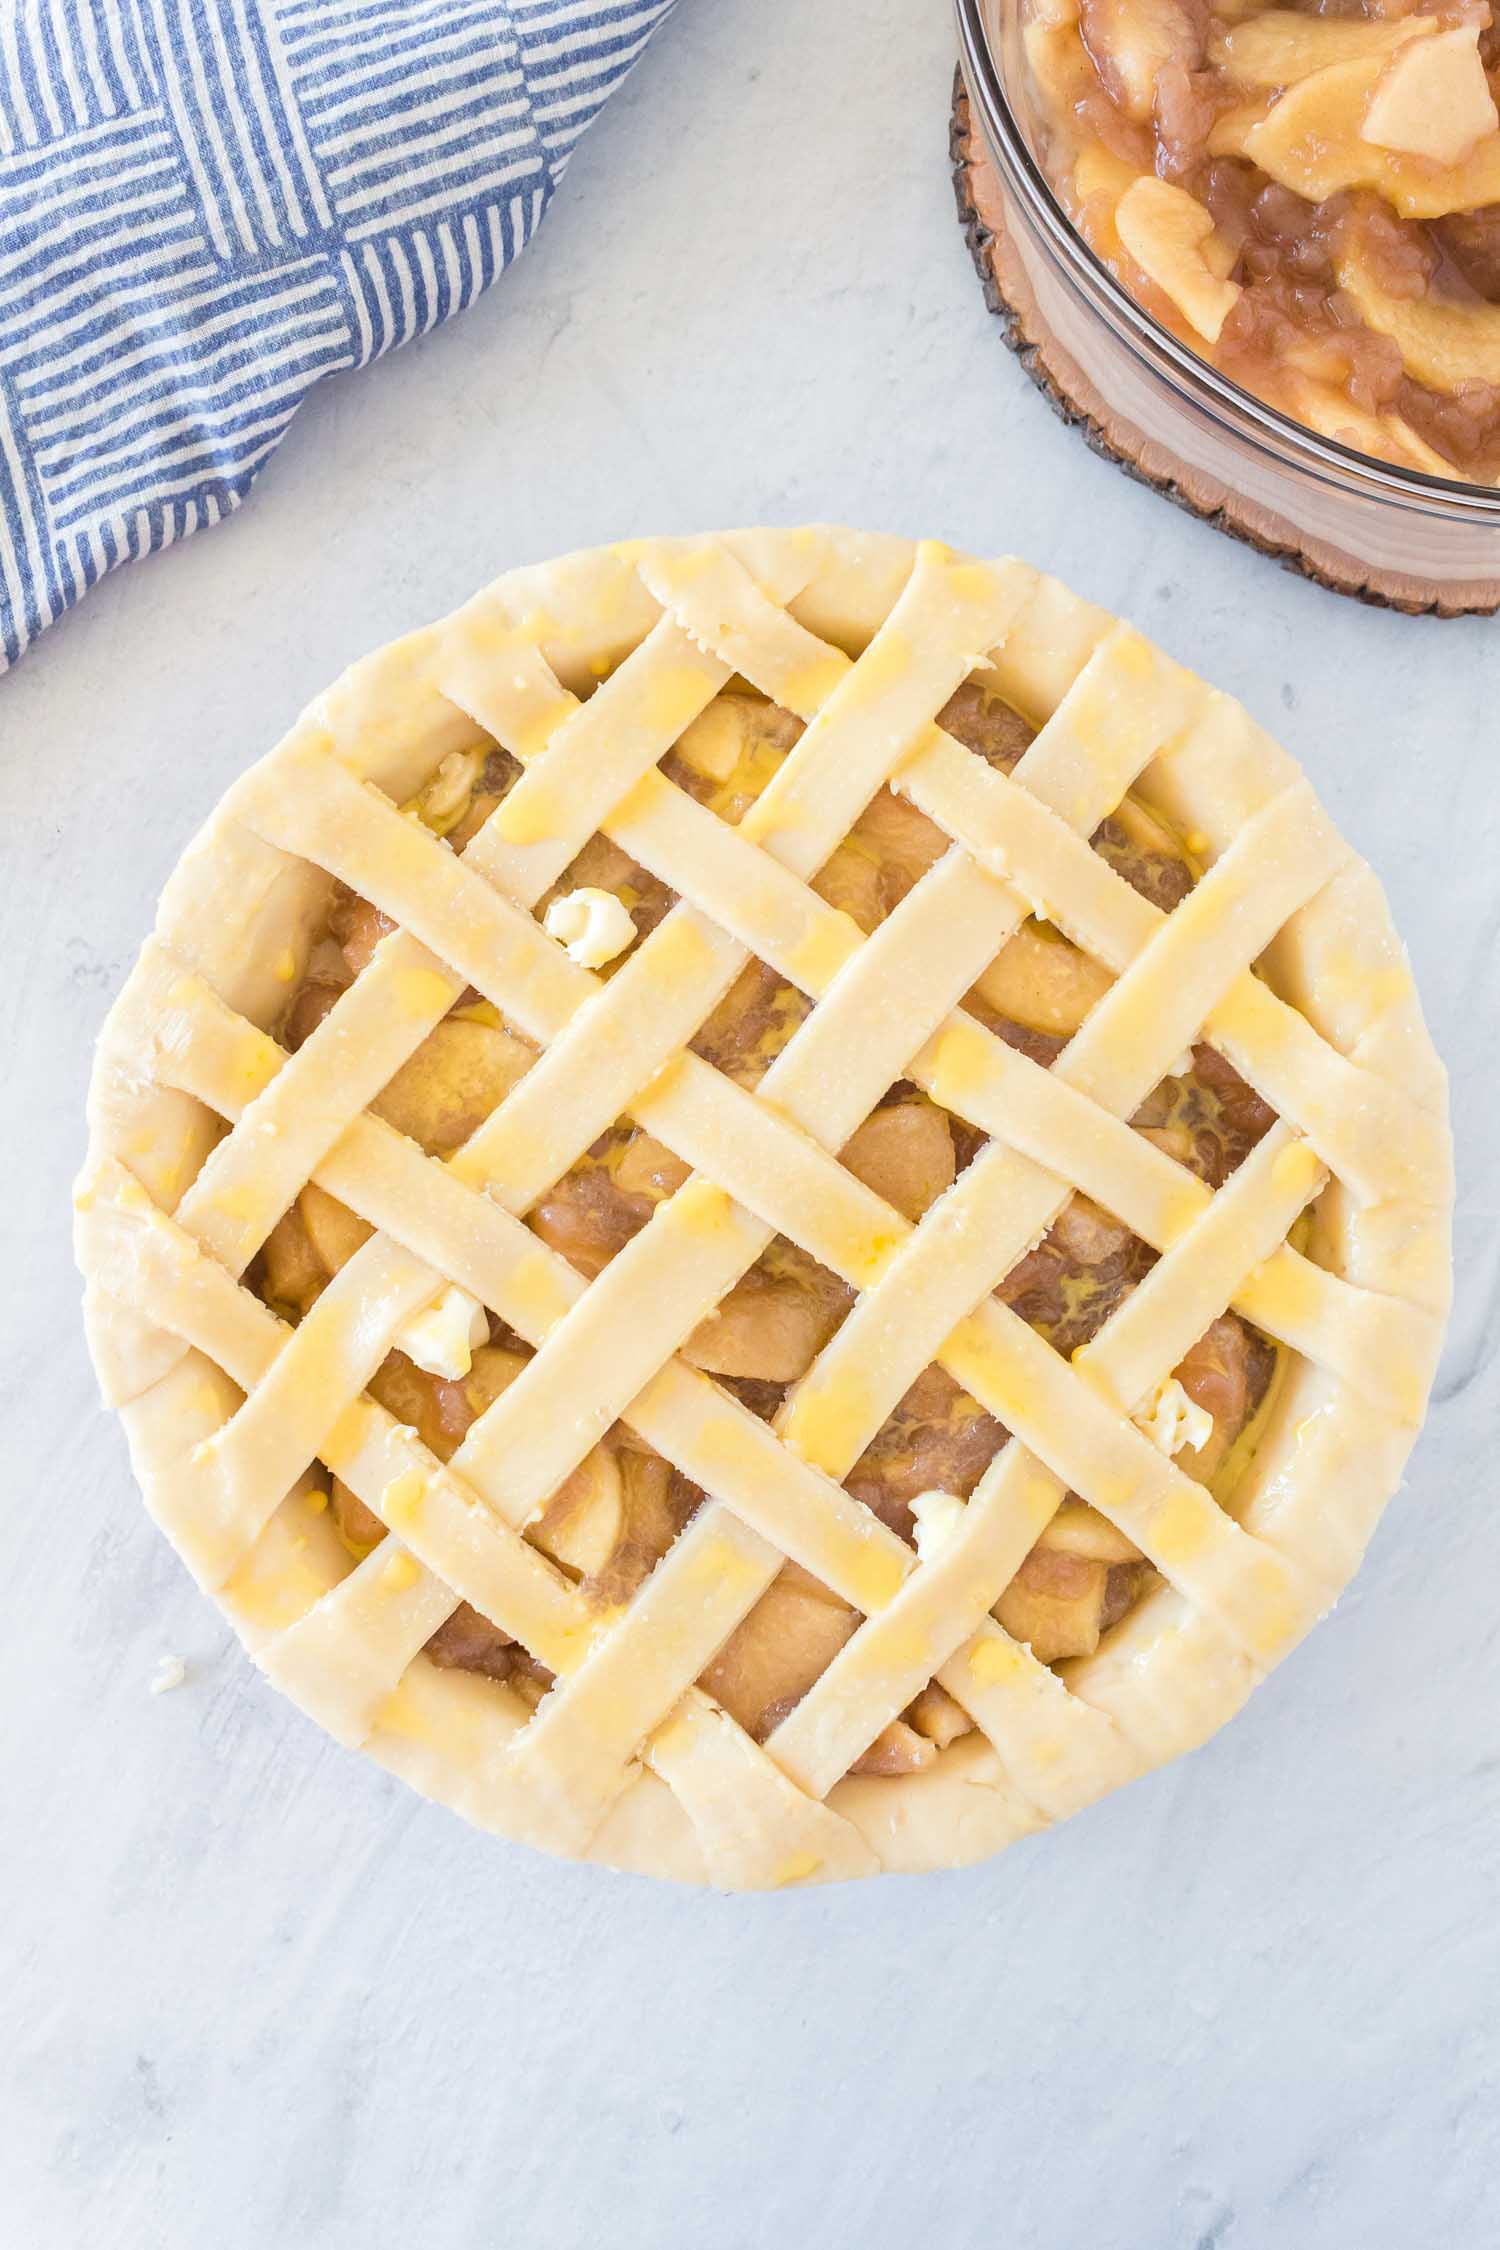
Brush top crust lightly with egg wash and sprinkle with a dusting of sugar for a beautiful crust. And bake it away until beautiful and bubby and golden.
HOW DO I USE FROZEN APPLE PIE FILLING IN A PIE?
Begin to thaw the frozen apple pie filling by placing the bag in the fridge 2 days before making pie. Once thawed, simply squeeze the filling out of the bag. Prep your pie pan by adding your bottom crust into the pan. Squeeze filling into pan and add top crust on top. Then bake as directed!
PRO TIPS/RECIPE NOTES
- Baking tip: A silicone pie crust shield will protect the outer ring of your crust from burning. You can also use strips of aluminum foil. Remove foil or silicone ring for the last 15 minutes of baking.
- Crust tip: Cutting a few small vents in your pie crust before baking keeps your pie from forming an empty air pocket between the top crust and the pie filling.
- Time saver: I’m obsessed with my apple corer peeler slicer. It’s been a game-changer and a timesaver, and one of my favorite kitchen gadgets. Use it to slice up those apples so much faster.
- Can I substitute light brown sugar for white sugar? Go for it! Light brown sugar is white sugar that has been flavored with a little molasses. Both sugars are equally sweet, although brown sugar adds a richer flavor that brings out the notes of cinnamon in homemade apple pie.
WHAT ELSE CAN YOU DO WITH APPLES?
- Dip them into a 3 Ingredient Cream Cheese Apple Dip
- Create these easy Campfire Apple Crisp Foil Packets
- Bake a yummy Freezer-Friendly Old Fashioned Apple Crisp
- Make this old-fashioned Apple Brown Betty Recipe
- Make a batch of hand-dipped Caramel Apples
- Make Canned Applesauce
The next time you make this apple pie, I would love to see it! Snap a picture and share it with me on Instagram using the hashtag #happymoneysaver and tagging me @happymoneysaver!
Best Apple Pie Recipe
Ingredients
Pie Crust:
- 2 1/2 cups all-purpose flour
- 1/2 Tbsp granulated sugar
- 1/2 tsp sea salt
- 1 cup cold unsalted butter 2 sticks diced into 1/4″ pieces
- 6 Tbsp ice water 6 to 7 Tbsp
Apple Pie Filling:
- 3-4 pounds apples (6-8) such as Golden Delicious, Cosmic Crisp, or Granny Smith
- 1 tbsp fresh lemon juice
- 3/4 cup sugar
- 1/4 cup all-purpose flour
- 1 tsp ground cinnamon
- 1/2 tsp salt
- 2 tbsp unsalted butter cut into small pieces
- 1 tbsp water
Egg wash:
- 1 egg beaten
- 1 tbsp water
Instructions
Pie Crust:
- Place flour, sugar and salt into the bowl of a food processor and pulse a few times to combine.
- Add cold diced butter and pulse the mixture until coarse crumbs form with some pea-sized pieces then stop mixing. Mixture should remain dry and powdery.
- Add 6 Tbsp ice water and pulse just until moist clumps or small balls form. Press a piece of dough between your finger tips and if the dough sticks together, you have added enough water. If not, add more water a teaspoon full at a time. Be careful not to add too much water or the dough will be sticky and difficult to roll out.
- Transfer dough to a clean work surface, and gather dough together into a ball (it should not be smooth and DO NOT knead the dough). Divide dough in half and flatten to form 2 disks. Cover with plastic wrap and refrigerate 1 hour before rolling out.
Make the Filling (or use 5-cups thawed apple pie filling)
- Preheat oven to 450 degrees (F) with oven rack on lowest position.
- Roll out your pie dough crust and place it in your pie dish, pressing it snuggly against the bottom and sides. This will be your bottom crust. Refrigerate it while you’re preparing the apple pie filling.
- Peel, core, and cut apples into 1/4-inch-thick slices; halve crosswise, and add to bowl. Pour lemon juice on top of apples and a few cups of water (to keep them from turning brown) as you work. Then drain apples using colandar and return to bowl.
- Remove dough-lined pie plate from refrigerator. Fill with apple mixture, gently packing apples and mounding slightly in center; dot with butter.
- Add top pie crust, pinching to seal top and bottom together. Add design or simply poke holes in top crust.
- Brush top crust lightly with egg wash and sprinkle with a dusting of sugar for a beautiful crust.
- Bake 20 minutes; reduce heat to 375 degrees (F) and bake until crust is golden and juices are bubbling, 50 to 60 minutes more. If edges brown too quickly, cover with aluminum foil. Cool completely, at least 6 hours, before serving.
Notes
Nutrition
Loved this recipe?
Make sure to follow on Instagram @happymoneysaver and on Pinterest @happymoneysaver for more money savin’ recipes!

About Karrie
Food is my love language. But so is saving money. So I like to combine the two a lot and make thrifty make ahead and freeze meals to save time. Because life is busy, and freezer meals can come to the rescue for all of us. And yes, they actually CAN taste good. Read more...


Comments & Reviews
Ginger says
Yo forgot to mix flour and spices into apples. 🤪
Cheryl Doll says
Sounds perfect, but nowhere in the recipe or on the entire description page can I find how big of a pie plate to use for this particular recipe. Otherwise, I’d give it a 5-star rating!! I have 9-inch, 9.5-inch, and 10-inch pie plates. So, I can’t make this yummy-sounding pie until I have that answer; can you please help??
Oh, and another consideration. I am older and I have Macular Degeneration. This really light gray typeface is absolutely a disaster to read, even with my newest glasses prescription. It would be wonderful if you’d please switch to black typeface or at least a dark gray. Thanks!
Britany says
You forgot the step “add spices” in your printable recipe!
Mary says
What to do if your pie turns out with a soggy bottom crust?